PO Box 2458, Tijeras NM 87059

Mountain Gardens--finding success with plants for the high desert and East Mountains of New Mexico

Tuesday, October 28, 2014

Quince


.
Quince is yellow till cooked


My grandmother had a quince bush back in Kentucky, and that was my introduction to this versatile fruit-- her preserves (though the fruit was hard as hell and made a painful thunk when you caught one upside the head). This was western Kentucky, and the winters were fairly mild. I don't remember the bush freezing down, and it had fruit every year. The tree in my daughter's garden is a lovely old thing, and fruits every year too. We got at least a bushel this year despite the bugs, and tried making quince butter and bandoline in addition to the usual jelly and membrillo.
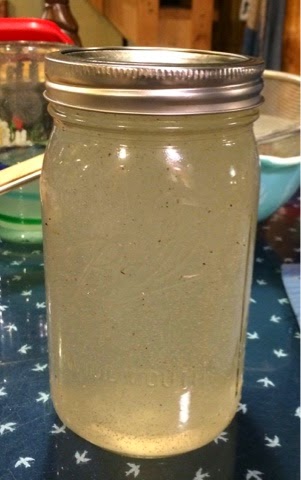
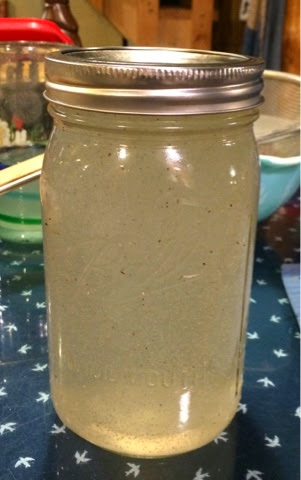
bandoline
 I borrowed an old book, Quince Culture, from Dwight's NAFEX library, and learned so much! The book was written by W.W.Meech and published in 1888, so I expected it to be more quaint than useful, but all the info has been applicable, and his recipes worked well. It explained why my grandmother had a bush, and my daughter has a tree--there was a lot of interest in the fruit back then; it was rare and costly--there were a number of cultivars "that vary in shape, size, quality, and dates of ripening." Some fruit reached a pound an a half in weight. Very common in the middle east, it may have been Eve's apple, and was called the Cydonian apple by the ancient Greeks. The ancients considered it to have medicinal properties, too, and a quick google reveals it as an ingredient in today's beauty preparations. Scientists are researching it for medical uses--for treating atherosclerosis among others.

Some could be eaten like a "soft, ripe pear." Our's are pretty hard. They have the woody granules that pears have, but so dense around the core that cutting through it requires a good knife. Cooking is a must. Our's are mild and tart.

The fruit has a peach like fuzz that needs to be rubbed off. Another fascinating property is the mucus secreted by the seeds; when you're cleaning out the seed your fingers get tackier and tackier--when you rinse them suddenly they're covered with gel (see the previous post for a pic). I wanted to germinate the seed so I washed them--and washed them, then left them to soak overnight in a bowl of water. That first batch took a lot of rinsing before they went into the frig--then I read the book and discovered a recipe for something called bandoline, a hair preparation used by Gibson girls at the turn of the 19th century. Gotta try something like that. 


If you save the seed to germinate, don't let it dry out (see previous post on seed starting). I put mine in a plastic bag in a handful of moist seed starting mix and put it in the frig. In a few months I'll bring it to 70 F and see what happens.


Squeezo'ing the cooked quince
Luckily we had another bag of fruit. I soaked about half a cup of seed in three cups of water overnight. (Meech said a ratio of 1:50--I guesstimated). It's like a liquidy jello, not disgusting (like mucus). I strained it and poured it into a sprayer. I used it after washing my hair, combing it through wet, crunching the curls as usual, and left it to dry naturally. My hair was soft, not sticky at all (a problem with lots of commercial preps for curly hair), and held the curl without frizzing. And I've used it for a couple of weeks now with no disasters. I froze the extra gel in ice cube trays because I didn't want to add the alcohol Meech recommended to keep it from going off. I probably won't have to buy my usual stuff for months. Pretty cool!

Another interesting thing about the seed is how it's packaged. Like apple seed, it circles the center of the core, encapsulated in five compartments that hold a lot, so one quince might yield 50 seed. The neat thing was even though bugs or rot penetrated the core, there were usually at least two compartments with unspoiled seed. We only lost a couple of quinces entire. With most of them we could we cut around the bad spots. Quince will keep well in a cool dry place, but pick unblemished ones to store. Look for frass around the blossom end even on fruits that appear perfect. 

Membrillo
We made the jelly first, chopping the peeled fruit in the vitamix, then hanging it in a jelly bag (old pillowcase) overnight. We canned the juice in the usual way. The only trick to remember is do NOT add the sugar until the juice is ready for the pectin (jams and butter, too), and cook in a stainless or copper kettle to develop that jewel like red color. 
After trying a variety of labor intensive ways of prepping the fruit (mostly in an effort to keep the seed whole), we cut away chunks of meat till the seed core was separated out. Then the whole mess went onto the stove with some added water to cook down, peel and all. The peel is high in pectin. When the fruit was cooked soft, I ran it through the Squeezo, a grinder like machine that cranks peel and seed out one side, and juice and pulp out the other, btw the easiest way to do tomatoes. I added cinnamon, nutmeg, and a little allspice--well a lot really--to taste for the batch of quince butter. I didn't add quite as much sugar as I would have for apple butter because I quite liked that spicy tartness. Didn't spice the jam, and sweetened more--for the kiddos.


Membrillo, or dulce de membrillo, aka quince paste, took the most prep time. The fruit is prepared adding lemon juice, and vanilla. Some recipes use shreds of lemon peel or other spices. The fruit is cooked with sugar until it reaches a deep red color, and then it gets poured into a parchment lined sheet pan, then goes into a low oven, 125-200 F depending on your oven. My 1951 Roper requires a close eye. The point is to dry the gel till it stands; most people pour it to a depth of about an inch. Our's was shallower, and dried faster. When the membrillo is cool, it can be cut into squares and wrapped in parchment. It will make a nice Christmas present with some of the jam, and a bottle of prickly pear jelly! 

Membrillo is traditionally served with manchego, but I like it with cream cheese--on celery, toast, and any other way you'd like to try it.


We also made a quince ratifia, but that's another post...

Quince Culture by Meech is a free download at  

Bandoline and the Gibson Girl at 
Wrapping membrillo


Thursday, October 23, 2014

Seed Starting--The Tough Ones

I  made a short presentation on seed starting at the last New Mexico Fruit Explorers meeting. I have since found my notes (!) and am going to take this opportunity to round things out.
Cleaning quince seed

Anyone can start veggie seeds with little difficulty. We've been selecting them to be reliable and easy for thousands of years, but today there's a lot of new interest in growing fruit and native perennials from seed--and these seeds can be tricky. 

Quince "slime" is good for skin--who knew?
Cleaning American persimmons
Seven days later

ALL plant seeds have some kind of inhibition mechanism that prevents germination, most have two, and some have more. Temperature, light, day length, moisture and any combination of these are triggers for germination. People, even professionals, gather seed and dry it carefully without realizing that half of all plants have seed that dies when it dries. This seed must be stored moist; some cannot be stored at all and must be germinated immediately.

To break inhibition seed must variously be washed, soaked, abraded, treated with vinegar or gibberellic acid--or none of the above. Some seed must be burned to germinate, some need to be eaten and "passed." Some seed requires oscillating temps over a period of years--think spring, summer, winter, over and over. Some can be chilled (vernalized) in the frig, some have to go through it au naturel. 

Any seed encased in pulp must be cleaned and washed. The pulp contains chemicals that prevent germination. Consider that in the wild fruits get eaten, or lie in leaf mold, experiencing rain, cold, etc. Some just need a quick rinse. The persimmon (pictured) took hours to separate from the pulp, and then was washed every day for a week, before going into a plastic bag of moist soil mix. Then it went into the frig at 40 F for about three months, and will be brought out to germinate at 70 F. I'll need to check it periodically because many seeds will start to germinate in the frig. I started a native viburnum two years ago, and it's just starting to germinate after several sessions in the frig. A native bane berry gathered in the wild and immediately stored moist in the frig germinated half a dozen seedlings in a matter of weeks, then nothing. After a return to the frig, then back out in 70 F, more seedlings emerged after two years.  So unless sources advise otherwise, always trial fresh seed immediately, even some like columbine or delphinium that usually require vernalization.

Another tricky thing some plants do--the radicle, the place where the root first emerges, germinates, then goes dormant until temps warm. You won't see top growth for six months or more. So be patient.  If I've given up, I'll dump seed into a cold frame, and have often been surprised.

Osage orange
Some plants set huge quantities of seed, most of which is non-viable. There is no embryo inside the seed coat, or it may not have matured. I gathered hundreds of the native Big Tooth maple, and perhaps six germinated. Native sumac may have only 50% viability. Some seeds are difficult to identify; I bought seed at a garden club sale, and there was no seed in the packet despite the entire flower head having been included. Seed is like snowflakes--no two are alike, from featureless specks the size of dust, to little hand grenades like the four o'clock, to enormous oblongs like the mango. There are millions of photos of seed online; make sure you get the right part of the plant.

One of the names most referred to at seed starting sources is Norman Deno, a professor who tested thousands of plant seeds for their optimum germination. In his book, he gives concise directions on starting many difficult plants. From his book, I learned that the American persimmon may continue to exude even after being washed for seven days. I learned that it germinates at 40-70 (50 % germinates in one to four weeks following a period of 40F with a period of 70 F. But outdoor treatment was fatal. 

Its good to know what cultivar you have--I'm still dithering over some buckthorn seed (he lists three), but which do i have? His book lists findings for all the seed he tested, and is available as a free download (see resources below).

Resources: 
Seed Germination Theory and Practice, Norman Deno--free download available at naldc.nal.usda.gov/download/41278/PDF--my first go to.

Prairie Moon Nursery--prairie moon.com  --Their catalog has a wonderful code for germination for all their native seeds, and great cultural planting instructions that aren't readily available elsewhere.

jlhudsonseeds.net --good starting and cultural info.

Seed Savers Exchange--seedsavers.org

theseedsite.co.uk  --UK site with a little bit of everything from photos to a junior seed site.

http://www.hardyplants.com/A.htm --from A to Z, a line or two of the most important bits.

Tuesday, September 16, 2014

Rose Hip Syrup

Aly, and Wilbur and I spent an afternoon hiking over on Sandia. We gathered a little seed from the wafer ash and hawthorns, not much because the bears evidently beat us to the fruit. But to our delight, there were still a lot of hips on the wild woods roses. A few minutes yielded about four cups worth--enough to make up another wildcrafting recipe, without feeling guilty about depriving the bears and other critters up there trying to fatten for winter.

Making the syrup followed the same initial process as the oil; wash, stem, etc.  Then the hips went into the vitamix till they were as well ground as possible without becoming a purée. The mix was cooked over medium heat in a heavy bottomed pot with lots of sugar. The syrup didn't have much flavor, so I added a couple of teaspoons of cinnamon, a good call because it went from bland to delicious. In retrospect we may be taking a little bit more than a teaspoon a day! Gilly tried it in her coffee, and liked it very much, thank you. The syrup is recommended as a topping for oatmeal, a sweetener for tea--use your imagination.

Rose hips are high in vitamin C, everyone knows that! Did you know they are a significant source of minerals potassium, magnesium, calcium, iron, phosphorus, and phytonutrients like quercitin, lycopene, galactolipids (?!), carotenoids, betasitosterol (!!!). Also high in vitamins A, K, E, niacin, folate, panthothenic acid, choline, and betaine. Then there's GOPO, isolated by researchers in Europe and being used to treat the pain of arthritis and other inflammatory conditions.  Hard not to get excited about an herbal application with so many uses, and virtually no side effects. It's been used for centuries to treat children's colds. And one researcher noted that even when the vitamin C breaks down, the other phytonutrients remain active.

There are a lot of recipes online, and all the ones in English are UK, which meant translating the measurements, further adapted because I had less than a kilo of hips. Loosely adapted (from jeremytaylor.eu), here's the recipe.

4 cups hips
6 cups sugar
2 cups water
Cinnamon

Get everything ready and work quickly because vitamin C begins to break down quickly. Crush the hips in a blender with two cups water (other readers noted the hips can be rough on lesser blenders). Add the hips to about 7 1/2 cups boiling water. Bring back to boil, and immediately remove from heat. Let stand for 15 minutes. Strain through cheesecloth. Return strained hips to more boiling water (Recipe got a little vague here--guessed and used about three cups). The blogger suggested the hips could be boiled and strained three times, but I did it twice. Consolidate and measure syrup. Bring to boil again with sugar. Immediately remove from heat, and put up in sterile jars.

Other commenters used less sugar. One shared an old recipe that also used rose water. Most folks are using species roses. Rosa woodsii that I used for my syrup, is a native American. Rosa gallica, the apothecary rose, is European. Rosa canina, the European dog rose, is specifically being used for GOPO formulations.
 

Friday, September 5, 2014

Rose Hip Oil

I can't believe how long it's been since the last post--mea mea culpa. I will do better.

For those of you who bought one of our apothecary roses before we closed, here's something to do with those big rose hips. (I found the idea at wildcraftvita.com). 

This is the first good year of bloom for my rose so there was only about a cup of hips to pick (which I wasn't too sad about because this is a thorny rose!)  I stemmed both ends, and washed the fruit. I cut each in half (wouldn't have if there'd been more).
The original recipe used jojoba, olive, and wheat germ oils, but I tried it with my own favorites--coconut and castor oil. In the past, I discovered that wheat germ oil dried my skin, and olive oil's downside is that it goes rancid. Both coconut and castor are unbelievably stable. They can be kept outside the fridge without going rancid--both are anti microbial, no little bugs or viruses are going to grow in them (huge amount about their beneficial properties online if you're curious). Coconut oil is solid at temps below 76 degrees, but melts readily, in warm water or your hands. Castor oil can be drying, so I used less, but it's a transporter, and can carry nutrients deeper into the skin, so I wanted to use some.

 I used about 5 oz of the coconut oil, 1 oz of castor oil, and about one cup of rose hips. The mix needs to go into a heavy double boiler, and simmers for six to eight hours. The recipe said that pink drops of oil would appear floating in the mix when the seed gave up its oil--I didn't see this, but there was a wonderful fruity fragrance, like jam cooking, which persists in the finished product.

After eight hours, I cooled the mix, then strained it in cheesecloth. The yield fit into one of my (clean) brown glass vitamin bottles which will protect it from light. I'm going to find one with a wide mouth because I decided to go ahead and keep it in the fridge reasoning that hips are high in vitamin c which doesn't necessarily keep well. The coconut oil hardened up in the fridge despite the castor oil which actually makes it less messy (once I remelt it, and put it in that wide mouth jar). I slather it on my face and neck morning and night. Guessing it won't get rid of wrinkles, but my skin is happy--and the results equal what I saw using those unbelievably expensive commercial products--so my purse is happy too.

One reason I wanted to try this recipe was because I've been making a mix of coconut, castor, fresh aloe (which is a whole different animal from the processed), and powdered vitamin c--but even in tiny quantities, it goes off before I use it. Doesn't get rancid, but the aloe sours, so now I'm just rubbing a slice of aloe on my skin every day, again huge benefits. And the dissolved vitamin c still had a slightly gritty feel when I rubbed the oil in.

I saved some seed which is curing in the icebox with all the other seed that requires chilling. I like the apothecary rose so much, I want more. I'll also take some cuttings, but haven't had as much luck with those. Now, if I can just get the
photos to upload, They'll be on the Mountain Gardens Facebook page if not...

Thursday, January 2, 2014

Catalogs!!!

The seed catalogs are pouring in, and like many of you, we're struggling with difficult choices. Hundreds of tomatos, tens of cukes, heirlooms, non-GMOs, new hybrids, veggies, flowers, perennials!!!

Stop, take a breath, think systematically (not my strong suit). First, I'm making notes, this year, for every catalog, item (including a few notes about the selection like length to maturity--always important up here), page number, price/quantity, etc. This lets me compare between catalogs, and eventually I'll consolidate my orders. Why pay $6.00 or $7.00 dollars for a package of 300 seeds from (---) when I only need 25? On the other hand, I really want to try Summer Girl tomato (49-52 days!), so I may end up spending $6.95 for 25 seeds. Ouch... But Northern Exposure is out of stock at Burpee!

Stop, take a breath, think...And so it goes.

I have my favorite suppliers, but this year, with the nursery closed I can spread my wings a little. No more Early Girl! I want to try Indigo Rose, a purple tomato high in anthocyanin (it's in the news). I'm intrigued by Peppermint Swiss Chard and Red Candy Apple onions--and Fairy Tale zucchini and Asparabroc broccolini. But first I need to go through my seed stash. If I already have twenty some packs of lettuce seed, is it really sensible to order more? Hmmm...

OMG, I just fired off an order! The internet is the very devil...but I have to get those Northern Exposure tomatoes, after all, and the prices were so reasonable for some other very desirable seed I've been wanting to try like the Romanesco broccoli--and systems were made to be broken, dammit. But I'll get back on track with the potato seed, melons, fennel, carrots, cukes, etc. I'm nothing if not methodical.

Before I fire off the next order, anyone who would like something particular started, just email it. Even though the nursery is closed, I have little confidence in my ability to start sane quantities of veggies. I'll start seeds beginning in February (peppers are soooo slow), but don't wait too long to contact us, because I'll have to order seed I don't already have (within reason, please). Or if you have seed, but don't have much luck germinating it...

Those who are trying to germinate seed, remember that most veggies are fairly easy, but some require cool, some heat, some light, some dark. Follow directions. There are easy annual flowers like cosmos and marigold, and difficult ones. Do some research. Perennials, especially flowering natives, can be really difficult. Again, do your research. Don't waste time and money spring planting seed that requires winter exposure or two years alternate chilling.

If you really get into it, one of my favorite resources is Seed Germination and Theory, by Norman Deno available for free download at http://www.scribd.com/doc/44360991/SEED-GERMINATION-THEORY-AND-PRACTICE-by-Professor-Norman-C-Deno

Friday, September 13, 2013

Still Blooming in my Garden

sunset hyssop (foreground) with sedum (center),
and Russian sage in back
With all the rain we've had this week, I wanted to post a few shots of my garden.
silver lace vine


chrysanthemum

The hugelkultur is capturing huge amounts of rainwater. So is the host of weeds. But (ignoring the weeds) the willows, evergreens, native perennials like amorpha, and non-natives like laburnum are doing great. Hoping to put in two more hugelkulturs over the winter and plant in spring with fruit and nut trees.


Sunday, August 25, 2013

Garden Club Visits Santa Fe Botanical Garden


The recently opened Santa Fe Botanical Garden at Museum Hill was a treat for the members of Mountain Garden Club on our August field trip. The drive along the Turquoise Trail has stunning views. The location of the garden is beautiful with the Jemez Mountains as backdrop. Lunch in the Museum Hill Café was delicious. But for gardeners the main event is always the plantings--and we were surprised to learn that though the infrastructure started to go in last fall, the plants have only been in the ground since May!
 
Creeping thymes and yucca near the entrance signal the xeric nature of this garden. Natives like fernbush, sage, and Mormon tea are used widely and with good effect. But there is an orchard and a rose garden too. Water catchment is an important part of the infrastructure with stone swales directing rainwater into a series of basins to the immediate benefit of the thirstier plants.


Gabion
A historic part of the garden is a gabion dam built by the CCC during the 1930's as part of water catchment in the Arroyo de Los Pinos. It needed very little work to restore it to full function. The Kearney Gap Bridge over the arroyo  was originally built in 1913 on NM 283 south of Las Vegas, NM along the Santa Fe Trail, and will eventually "bridge" the way to the Naturalistic Gardens.


There are several inviting courtyards where one can just sit and enjoy--beautiful with native rock, a small fountain, fruit trees, and plantings of penstemons, chamisa, yarrows, and agastaches. Along the trails and other gardens plants include aspen, cottonwood, and other native trees, native grasses like Indian rice grass, and shrubs like apache plume. For a more comprehensive list of plants, and maps of the gardens visit santafebotanicalgarden.org.
Docent guided tours are available, as are many other educational opportunities.

The garden was designed by W.Gary Smith, a nationally renowned landscape architect.


Tuesday, August 13, 2013

OMG--Dodder!!!

Traveling 'string'
The dry hills of California are covered with this evil stuff; it seems to occur everywhere--but not here, high in the mountains of New Mexico, at least not until now. Wandering around amazed at the new growth stimulated by the tremendous rain we've have in the last few weeks, we stumbled over a patch of yellow silly string, and I really did gasp in horror, "Oh my god!" (I didn't have the good sense to get a pic of that original mass.)

Difficult to spot till the growth is really spread out, I don't know how bad the infestation is. The "strings" are fine, and travel looking for victims. The stuff I've seen other places is bright orange, but ours' is yellow. When the dodder finds its vic, it infiltrates the plant, then draws all its sustenance from it, eventually killing the plant. There is no treatment; both dodder and host must be destroyed. Given the number of fruit trees I have, that is too terrible to contemplate!
dodder flowers

Recommended treatment includes burning out, or spraying with herbicide. By the time we spotted the dodder, it was already flowering, hence SEED. So we opted to burn hoping that would destroy the seed as well as the mature plant, and infected hosts. We'll keep checking to make sure the original dozen or so sites are clear. Any remaining plant material, I'll try to rake (inward), and bag for the trash.

The burn...
Gardens Alive has a concise article about dodder--http://www.gardensalive.com/article.asp?ai=1115. There is a lot of other material online, too.

The UC Davis site is very thorough including preferred hosts, "Dodder species vary in the number of different host species they can infect. Some, such as C. salina, are in rather restricted sites such as salty marshes, flats, and ponds on just a few host plant species.
Scorched earth policy...
Others, such as C. pentagona (C. campestris in some publications), are found on many crop and weed species including alfalfa, asparagus, melons, safflower, sugarbeet, tomato, field bindweed (Convolvulus arvensis), lambsquarters (Chenopodium album), and pigweed (Amaranthus species). C. indecora, also has a wide host range that includes alfalfa and weeds such as field bindweed, five-hook bassia (Bassia hyssopifolia), lambsquarters, and Russian thistle (Salsola tragus)."

All of our spots had either pigweed or purslane. If you don't recognize these, keep checking back. I'll be posting a lot of pics of the weeds that have exploded in the last few weeks. All those seeds were just laying dormant in the soil till enough moisture occurred!

The last photo on the right shows the worst site--10 to 15 feet wide, running sporadically down the hill for about 30 feet. We'll be doing a wider inspection over the next days; we only checked and treated about five acres--95 more to go!


Wednesday, January 2, 2013

A Pot for Vertical Gardening

Happy New Year, everyone!

With the cold weather upon us, we've been catching up on our reading, trying to stay abreast of gardening trends. Commercial horticulture is going through an upheaval just now. Even the big guys are paying attention, and us little guys are running in place.

The journals tell us that the interest in fruits and veggies will continue strong, especially among young people. The market for natives and drought tolerant plants is still there and swelling (no shock there given the ramifications of global warming.) Fairy gardens and terrariums, hmmm. Shades of my youth, guess we'll pot up a few terrariums, but anyone can stick some miniatures in among the plants, and given the cost of "fairies" and their furnishings, we'll have let our customers discover their own. Living roofs are wonderful; they'll be a real boon to the urban environment where stormwater runoff needs to be addressed, along with the urban heat sink, but I think that out here in the New Mexico sticks, roof water needs to be captured, in cisterns, basins and swales, rain gardens. Seed saving is a growing trend, easy and rewarding, and I hope more gardeners will join organizations like Seed Savers and  buy from Seeds of Change.

Bel embellishes a hanging pot
It's hard to find an issue of any gardening journal that doesn't have an article or photos about vertical gardening. From the huge, expensive installations of Patrick Blanc, or the one at Longwood Gardens, to medium priced kits, to one pot hanging on a garden wall, there's something for everyone. (http://pinterest.com/joeast/--see Verticality for some great photos) There are some really clever homegrown designs out there using everything from pallets and cinderblock to hanging shoe bags. Think of what a vertical garden would do for a chain link fence!


Again, there's a lot of interest in vertical gardening in urban environments, not just as a softening of the concrete jungle, but a cooling of the heat island, capturing rain water runoff, and even growing local foods where there is precious little open ground. Apartment dwellers can utilize their balcony walls--there are big dividends to greening the urban adventure.

Suburbanites with small yards are also finding verticality practical, and here in New Mexico where courtyards are a popular, even necessary feature, there are lots of walls that hold heat in winter, and offer windshelter in the summer. But before anyone rushes out to buy one of the  multitude of new hanging wall systems, they should consider a few points.

One--make sure your container is strong enough to support the weight of soil, plant and water. Two--make sure water will not pool against the wall; moisture can penetrate sheathing in a variety of ways that can lead to rot or termites. Three--make sure the planting pockets will hold enough soil for the particular plants you want. Four--like all containers, vertical planters will need care in winter in temperate climates. Five, like all containers, their fertility will be leached by consistent watering, and veggies especially will need additional fertilizer. Think about starting small until you know you can keep up with the watering and care these hanging gardens need.

After much nagging, Bel finally caved and has started crafting some pots for us. We've already potted up the first prototype. We had to cede the far end of the greenhouse, but she has promised to drag out her potter's wheel, and show Aly and I how to throw--we have so much time on our hands! But we're going to need some beautiful pots for another trend we're fascinated by--kesheiki...but that's another blog.

Monday, December 17, 2012

Winter Work in the Mountains

Lest anyone think we spend our winters recuperating from our hectic summer pace, our feet up in front of the fire enjoying the empty hours--here are some of the chores that keep us moving.

When the first hard freeze hit, icing caused the pumping rod on the windmill to noodle up. When the fan continues to turn, the captured rod can't slide up and down, and begins to twist. It can get amazingly distorted, preventing it from functioning after the ice melts. Bad things happen if this isn't caught soon enough. We know this, yet somehow the first hard freeze always catches us by surprise. This year wasn't as bad as past years, but we still had to straighten the rod. This is bad enough.

 Someone has to climb the 30 feet up to the fan assembly, disconnect the rod and lower it down. This takes muscle and know-how. Wilbur is elected (sometimes it's good to know no-how). We already stabilized the 380 feet of rod in the ground before separating if from 20 so feet above (it takes a crane to pull the whole length of rod if it should by some terrible bit of luck slip).


On the ground, Aly and I have the top sections of rod on a looong rope lowering it down (no photo obviously because it's reaallly heavy, and I can't be taking pictures which they keep yelling, this being an exciting part). Aly and I eventually get the rod down and beat it back into shape. By this time, there is a little breeze, and Wilbur is getting nervous. We haul the rod back up and he gets it reconnected. At this point he was supposed to climb onto the box at the end of the tail, and change the 5 gallons of hydraulic fluid that keeps things turning smoothly; this is quite a trick for a young guy on a still day. He’s not young, and the fan is beginning to strain at the chain. The fan will have to grind away, as we decide to save this task for another day.

Back on the ground, the three of us try to get the sections of rod hooked back up. This is another tricky part. The unchained fan is turning erratically despite the brake.  This is moving the top section of rod. A couple of years ago, I helpfully aligned the two sections while Wilbur and Aly were looking away, so as to quickly thread the sections together. When the two sections bumped, the fan drove them together crumpling the top back into the “S” shape we had just spent some hours fixing. I was unpopular for some time after that, but learned an important lesson—never show initiative when repairing a windmill. This time the sections joined smoothly. We are always surprised when this happens. 

 Chores are unrelenting during the winter. Most are not as dangerous as working on the windmill, but there’s often a little frisson of anxiety when working around farm equipment. We bring in our own wood for heat, and we each have our own chain saw—mine is the smallest, but it gets the job done. All that wood has to be split, and Wilbur split his fingernail in half the last time he used the splitter. We weren’t surprised when this happened as he tends to bleed on every job; if these were the days of blood sacrifice, this place would be a temple. 

It’s gotten cold again (windmill’s disconnected-yay), and it’s snowing, so we’re using more propane in the greenhouses (boo). We have lots of tanks that need to be kept filled, because if the two propagating houses freeze, months of work is lost. This is Wilbur’s job, another case of know-how. After he dealt with the propane, we all bundled up and went out to put the snow blade on the tractor. Pretty soon, he’ll go back out to plow the half mile of drive. If it gets bad enough, Aly will join him on her tractor.  They have the tractor know-how. I’m just the cook. It’s good to have people with know-how. 

Got to go; just got the second section of scaffolding up on the wall we’re building. When we get time, we work on the interior. Chores...

Sunday, December 2, 2012

Great Green Walls

There's an interesting article in my latest Lawyer's catalog about the Great Green Wall initiative. There are plans afoot to build what is essentially a windbreak nine miles wide and 4,400 miles long from Dakar to Djibouti (east coast to west coast). This amazing multi country project will attempt to halt environmental degradation and slow creeping desertification.

In China, a Great Green Wall being planted for the same purpose will cover 42% of the country by 2050. The Chinese have planted 56 billion trees in the last ten years. There is a lot of controversy over these projects--but as the Amazon loses 2,700 million acres a year, replacing some of that biomass elsewhere can't hurt.

There is a lot of renewed interest in the windbreaks planted during the Dust Bowl period, which had a major impact on loss of topsoil then and for many years after. Lawyer's notes that most if not all of these have disappeared, making room for modern irrigation systems.

Today, as I watch my New Mexico soils heading north on every errant breeze, I am contemplating my own wind break. I am still plotting the best layout, and assembling a variety of trees and shrubs, but this spring, come hell or high water, the planting begins.

Saturday, December 1, 2012

Fruit Explorers Follow Up

We've just had our second meeting of the tentatively titled New Mexico Fruit Explorers (see October post) and we've already got a pretty impressive membership. Naming no names (without permission) we have some truly knowledgeable folks whose expertise spans apples, apricots, figs, Chinese dates and more.

Though nothing is firm yet, we're talking about hosting workshops (got some great grafters!), tours of our respective holdings, and field trips. Meetings are on the first Saturday of the month, and anyone with an interest in fruit is welcome. Amateurs to experts, or even if you just like eating it, and would like to know more. Email for more information.

Tuesday, November 27, 2012

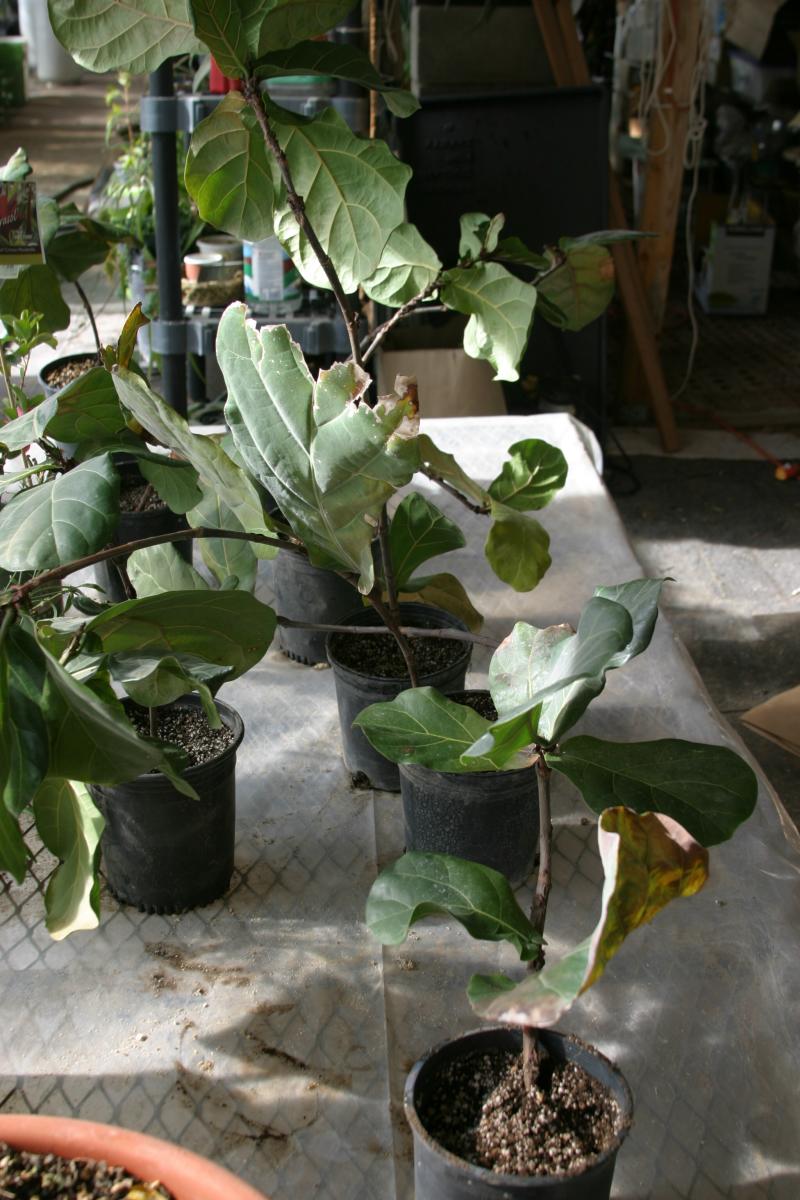
Air Layering Fiddleleaf Fig

Early in September we decided to tackle the fiddleleaf fig that was touching the 15 ft ceiling in number 1 greenhouse. It took both of us to drag the monster outside where it got a much needed shower before surgery (there is a faint omnipresent haze of dust in the air here, even on the stillest of days--hence the shower). Aly and I made about 10 layers, each about three feet long, not counting a number of small cuttings we took. And there's the advantage to airlayering a tropical that makes cuttings easily--a much bigger plant.

We began by girdling the limb we were going to layer. A small box cutter with a new blade makes this the easiest part of the procedure. I made two cuts that sliced through the bark and cambium about an inch apart completely encircling the stem. I can then draw the blade from upper cut to lower cut without danger of overshooting and leaving a ragged edge or flap.

It took several days of soaking to get the peat hydrated--New Mexico. We firmed a handful of very wet peat completely around the cut--this is where two sets of hands are useful. It's not easy holding onto the stem, while keeping the peat in place until it's securely wrapped.

There are a number of commercial gadgets out there to accomplish this part, but foil has always worked fine for me. In Florida, the land of perpetual trickling sweat, foil was enough. Here in New Mexico, keeping the peat wet until roots emerge is tricky; I used a layer of plastic wrap, enough to cover the peat with a lot of overlap, with the ends twisted tightly around the stem.


The foil is wrapped over that, again tightly squeezing the ends shut to seal in moisture. I tied both ends snugly with twine just to be safe. Then we dragged the monster back inside.

Fast forward to mid-November. Roots have developed nicely, and none too soon; despite two layers of protection, the peat is drying out.

We've just finished potting up all the layers that we made in September. Although houseplants are not really our thing, we'll sell these next season when Mountain Gardens opens. For someone who considers herself an outside gardener, I seem to have acquired a lot of houseplants in sore need of division or cutting back.

Speaking of which--the monster was unfazed by our surgery. Maybe this time we'll use two layers of plastic.

Tuesday, November 6, 2012

What's Still Green in the November Garden???

It's supposed to get cold again this weekend, more wind. While the days warm up, our nights are dipping below freezing, ice in the morning on the birdbath. The coneflowers are done, the hyssops brown stalks, the gailliardia a crisp haze of seed fluff. The garden's winding down and winter's on the way. It's a good time to poke around out there and make some notes.
Lamb's ear

Santolina
Dianthus
I like to see what still has a nice green presence despite the freezes--like the very ordinary lamb's ear, soft and silvery. The grey santolina looks very nice, too. The dianthus has flowered until the very second I took the photo (a carnation is still putting out buds). So is the white tufted evening primrose, a native that blooms nonstop. A pattern seems to be emerging--these  plants all have silver grey foliage.

Still looking good, and yes, silver, are the artemesia's--wormwood, Powis Castle. Horehound is everywhere in the mountains, one of the medicinal herbs brought in by the earliest Spanish settler's and escaped. Kept trimmed up, it's a nice filler, and useful if you're an herbalist.

The sages are wonderful choices for the mountains, tough, fully winter hardy, delicious. The varigated form shown is not quite as reliable as salvia off.', but its pink and silver make any companions stand out. I haven't found anything it doesn't look better next to.

These silvery plants are among the best choices for up here, tough, drought tolerant in this arid climate, and yes, lovely far into the end of the garden season.
Horehound & yarrow

Some nice, bright greens that still look fresh are heuchera, another native, salvia nemerosa, the iceplants and sedums, evergreen germander, the yarrows. One of the yarrows still sends up an occasional burst of pink.

I'm taking my notes, looking for holes of course, and areas that need more (or less) silver. It's still a raw, new garden, the trees and shrubs too small to have any significant impact, so the herbaceous perennials provide form, texture, color. Eventually there will be windbreak trees, walls for shelter. (I don't understand why our winds don't have some romantic name like the Santa Ana's, or sirocco, or mistral--a lovely spanish word for unrelenting, pitiless, maybe despiadado. "The despiadado's have returned--I shall go mad.") But the wind has been quite mild so far this fall, and I'm my prosaically sane self.

The native geraniums are filling in nicely under a tall juniper, their leaves coloring up a bit, ditto the plumbago with a few bits of blue petal left. Colder weather coming, hope it looks this nice next week.


Varigated sage


White tufted evening primrose (dianthus & artemesia on left)

Heuchera & salvia

Germander

Yellow iceplant